
A slim thick full body workout at home builds that shape by targeting your glutes, hamstrings, and shoulders with bodyweight exercises while keeping your waist tight through core control. The challenge isn't finding a gym—it's creating enough resistance and progressive overload using only your body, which requires specific exercise variations and rep schemes most beginners skip.
This guide walks you through a complete workout structure that hits every muscle group needed for balanced curves: lower body exercises that actually activate your glutes (not just your quads), upper body moves that build shoulder width, and core work that strengthens without bulking your midsection. You'll learn why standard squats often miss the mark for glute growth at home, which exercise angles create the most tension, and how to progress without adding weight.
What "Slim Thick" Actually Means for Your Training
Slim thick refers to a physique with developed glutes, thighs, and shoulders combined with a defined waist and core. From a training perspective, this means you need to prioritize muscle groups that create curves (posterior chain, side delts, glutes) while maintaining overall leanness through full-body conditioning.
The main mistake: doing endless squats and expecting balanced development. Squats primarily work your quads when done at home without weight, and they don't provide enough horizontal resistance for your glutes. You need a mix of hip extension (glute bridges), hip abduction (side-lying work), and loaded carries or holds that challenge your shoulders and core.
Your waist stays tight through bracing exercises and avoiding movements that over-develop your obliques in a bulking phase. This doesn't mean skipping core work—it means choosing planks, dead bugs, and hollow holds over weighted side bends.
The Pulling Problem: Why Back Work Is Hard at Home
Most home workouts underwork the back, and that's the biggest gap in programs that claim to be "full body." Without a bar to pull, you're left with limited options: doorway rows using a towel, inverted rows under a sturdy table, or floor-based supermans and reverse snow angels. The back creates the visual taper from shoulders to waist, so skipping it leaves you with an imbalanced shape.
If you have a doorway pull-up bar, use it. If not, use resistance angles that work with what you have: lie face-down and pull your elbows back while squeezing your shoulder blades, or wrap a towel around a doorframe and perform seated rows. The goal is scapular retraction—actively pulling your shoulder blades together—in every back exercise.
The Complete Workout Structure
This is a three-day split that you can run Monday/Wednesday/Friday or Tuesday/Thursday/Saturday. Each session is 35–45 minutes. Rest at least one full day between sessions to allow for recovery, especially in the glutes and hamstrings, which need 48 hours.
Day 1: Lower Body Focus (Glutes, Hamstrings, Quads)
- Glute bridge (standard, then single-leg): 3 sets of 15–20 reps
- Bulgarian split squat (rear foot elevated on couch or chair): 3 sets of 10–12 reps per leg
- Single-leg Romanian deadlift (bodyweight, with a 3-second lowering phase): 3 sets of 10 reps per leg
- Side-lying hip abduction (toes pointed forward, top leg straight): 3 sets of 20 reps per side
- Reverse lunge to knee drive: 3 sets of 12 reps per leg
- Wall sit: 2 sets of 45–60 seconds
Day 2: Upper Body and Core
- Pike push-up (hips high, elbows tracking back): 3 sets of 8–12 reps
- Standard push-up or knee push-up: 3 sets of 10–15 reps
- Doorway towel row or inverted row under table: 3 sets of 12–15 reps
- Plank to down dog: 3 sets of 10 reps
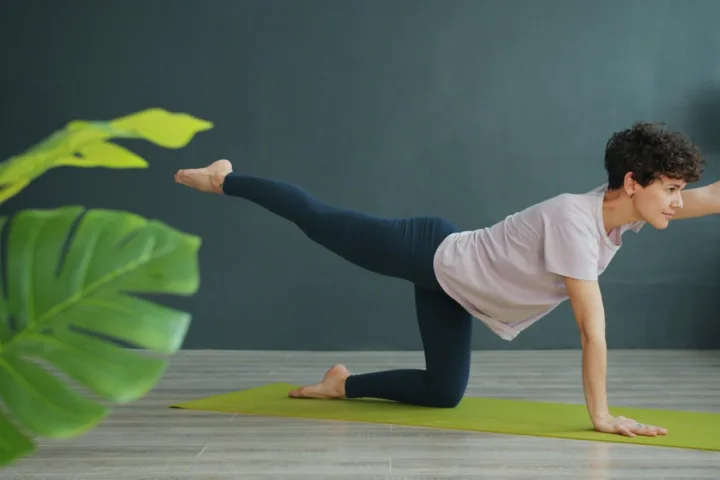
- Dead bug (opposite arm and leg extend): 3 sets of 10 reps per side
- Hollow hold: 2 sets of 20–30 seconds
Day 3: Full Body Conditioning and Glute Burnout
- Jump squat or squat pulse (if jumping isn't an option): 3 sets of 15 reps
- Curtsy lunge: 3 sets of 12 reps per side
- Shoulder tap plank: 3 sets of 20 taps (10 per side)
- Glute bridge march (hold bridge, alternate lifting one foot at a time): 3 sets of 20 steps
- Fire hydrant to back kick: 3 sets of 12 reps per side
- Bicycle crunch (slow, focus on opposite elbow to knee): 3 sets of 20 reps
Track your reps in a notebook or phone. When you can complete all sets at the top of the rep range with good form, increase the difficulty by adding a pause at the hardest point, slowing down the lowering phase to 3–4 seconds, or adding a pulse at the end of each rep.
Exercise Breakdowns: Form Cues That Change Results
Glute bridges: Lie on your back, feet flat, knees bent. Press through your heels and squeeze your glutes at the top until your body forms a straight line from knees to shoulders. Hold for 2 seconds. Don't hyperextend your lower back by arching too far—your hips should tuck slightly under at the top. For single-leg bridges, keep your hips level the entire time; don't let the working side drop.
Bulgarian split squats: Place the top of one foot on a couch or chair behind you, standing far enough forward that your front shin stays vertical when you lower. Drop straight down until your back knee nearly touches the floor. Press through your front heel. If you feel it all in your front quad, shift your front foot forward an inch. This is the hardest lower body exercise you can do at home without weight, and it creates the most glute and hamstring tension.
Single-leg Romanian deadlifts: Stand on one leg, hinge forward at the hips while your other leg extends straight back. Keep your back flat, core tight, and reach your hands toward the floor. The movement is a hip hinge, not a squat—your standing knee should only bend slightly. You should feel a stretch in the hamstring of your standing leg at the bottom. The 3-second lowering phase is where the muscle growth happens.
Pike push-ups: Start in a downward dog position with your hips high and hands shoulder-width apart. Bend your elbows and lower the top of your head toward the floor between your hands. Press back up. This targets your shoulders more than standard push-ups and is the closest bodyweight substitute for an overhead press. To progress this, elevate your feet on a couch.
Side-lying hip abduction: Lie on your side with your bottom leg bent for stability and your top leg straight. Point your toes forward (not toward the ceiling), and lift your top leg about 12 inches while keeping your hips stacked. The small range of motion is intentional—this isolates the gluteus medius, which creates hip width and stability. If you feel it in your hip flexor (front of your hip), reset and make sure you're not rotating your hip forward.
Progressive Overload Without Weights
Progressive overload means consistently increasing the challenge your muscles face, and it's the only reliable way to change your body composition. At home without external weight, you have six methods:
- Add reps: Move from 10 to 12, then 12 to 15, within your working sets.
- Add tempo: Use a 3-second lowering phase and a 1-second pause at the hardest part of the movement.
- Reduce rest: Drop rest periods from 90 seconds to 60 seconds between sets.
- Increase range of motion: Elevate your hands for push-ups, or your front foot for split squats.
- Use single-leg or single-arm variations: These double the load on one side.
- Add isometric holds: Hold the top of a bridge for 5 seconds, or the bottom of a squat.
Start with one method and apply it for 2–3 weeks before adding another. The most common error is changing too many variables at once and losing the ability to track whether you're actually progressing.
Common Mistakes and How They Stall Progress
Doing squats only: Standard squats load your quads more than your glutes, especially without external weight. Your glutes are hip extensors (they straighten your hip) and hip abductors (they move your leg out to the side). Squats work extension but don't train abduction at all, and the angle of a bodyweight squat doesn't create enough glute tension. Include bridges, split squats, and abduction work.
Skipping single-leg exercises: Bilateral moves (both legs at once) let your strong side compensate. Single-leg work exposes imbalances and forces each side to handle the full load. Most of your lower body work should be single-leg after the first month of training.
Not feeling the glutes during lower body exercises: If you feel all quads and no glutes during squats or lunges, the problem is usually foot position or lack of activation. Before your working sets, do 2 sets of 20 glute bridge pulses with a 2-second squeeze at the top. This primes the neural connection between your brain and glutes. During the working sets, actively think about squeezing your glutes on every rep.
Training core like it's 2010: Sit-ups and crunches work one function of your core (flexion) and ignore stability, which is what keeps your waist tight during loaded movements and daily life. Prioritize planks, dead bugs, and carries (hold a gallon jug of water in one hand and walk 30 steps). These teach your core to resist movement, which is its primary job.
Expecting results in two weeks: strength usually improves first in beginners, and visible changes in muscle shape typically take several weeks of consistent progressive training. Strength gains come first (weeks 1–4), followed by visible muscle development. If you're not seeing changes by week 8, your diet or your progression strategy is the limiting factor, not your exercise selection.
The Diet Side: What Training Can't Fix
You can't out-train poor nutrition. Building muscle requires a calorie surplus or at minimum maintenance calories plus adequate protein—according to the International Society of Sports Nutrition, 1.4 to 2.0 grams of protein per kilogram of bodyweight per day supports muscle growth in people who train regularly. For a 68 kg (150 lb) person, that's 95–136 grams per day.
A slim thick physique requires both muscle building and staying relatively lean, which means you need to be strategic: eat in a small surplus on training days and at maintenance on rest days, or alternate 8-week building phases with 4-week maintenance phases. Trying to build muscle while in a steep calorie deficit doesn't work—your body needs resources to repair and grow tissue.
This isn't nutrition advice for a specific individual. If you have health conditions or a history of disordered eating, work with a registered dietitian who can assess your needs.
Sample Weekly Schedule and Realistic Timelines
Week 1–4: Learn the movement patterns, build your baseline. Track every workout. You should feel stronger each week—more reps, better control, less shaking during single-leg work.
Week 5–8: Add one progression method (tempo or reps). You should start seeing subtle visual changes by the end of week 8: improved glute shape, better shoulder definition, and a tighter waist when you brace.
Week 9–12: Add single-leg progressions and reduce rest periods. This is when balanced development becomes visible—width at the shoulders and hips, tightness through the core.
After 12 weeks: You've built the foundation. At this point, consider adding resistance bands (especially for back work) or adjustable dumbbells if you want to keep progressing efficiently. Bodyweight training has a ceiling, and most people hit it between 3 and 6 months.
| Phase | Duration | Focus | Expected Change |
|---|---|---|---|
| Foundation | Weeks 1–4 | Learning form, building work capacity | Strength increases, improved movement quality |
| Progression | Weeks 5–8 | Adding reps and tempo | Visible muscle tone, better endurance |
| Refinement | Weeks 9–12 | Single-leg dominance, reduced rest | Balanced curves, defined waist |
| Advanced | Month 4+ | Consider adding equipment or higher volume | Continued size and strength gains |
Training Around Your Cycle
Many women notice strength and pain tolerance vary across their menstrual cycle. A 2020 meta-analysis in Sports Medicine found that exercise performance may be trivially lower in the early follicular phase, around your period, but the effect was small and varied widely between individuals. This doesn't mean skip workouts during your period—it means be flexible with your progression. If week 3 of your cycle feels unusually hard, maintain your current volume instead of pushing for more reps, and resume progression the following week.
Some women experience more joint laxity around ovulation due to hormonal shifts, which can slightly increase injury risk during explosive movements like jump squats. If your knees or hips feel unstable, swap jumps for controlled pulses or slow tempos that day.
What Research Says About Building Curves
Backed by research
What studies say about glute and shape training
- Using estimated 10-rep-max loads, the barbell hip thrust activated the gluteus maximus more than the back squat; bridges and hip thrusts train the same hip-extension pattern at home.Source: Contreras B et al. (2015). A comparison of gluteus maximus, biceps femoris, and vastus lateralis EMG activity in the back squat and barbell hip thrust. J Appl Biomech
- In a study of common rehab exercises, side-lying hip abduction produced the highest gluteus medius activity (about 81% of maximum), roughly double the clamshell.Source: Distefano LJ et al. (2009). Gluteal muscle activation during common therapeutic exercises. J Orthop Sports Phys Ther
- Spot reduction is not supported: in a controlled trial, six weeks of abdominal exercise alone did not reduce abdominal fat. A smaller waist comes from overall body-fat change, not waist exercises.Source: Vispute SS et al. (2011). The effect of abdominal exercise on abdominal fat. J Strength Cond Res
- A 2016 meta-analysis found that training a muscle group twice a week led to more growth than once a week.Source: Schoenfeld BJ et al. (2016). Effects of resistance training frequency on measures of muscle hypertrophy. Sports Med
Safety note: This article is general fitness information, not medical advice. If you have an injury, a heart or blood-pressure condition, are pregnant or postpartum, or have not exercised in a long time, check with a doctor or physiotherapist before starting. Stop and get advice if you feel chest pain, dizziness, unusual breathlessness, or sharp joint pain. Body shape also depends on genetics and overall body fat, which training alone does not fully control.
What This Guide Is Based On
This workout structure is based on exercise science principles for hypertrophy (muscle growth) and biomechanics of the glutes, hamstrings, and shoulders. The exercise selection reflects the movement patterns needed to train all three gluteal muscles (maximus, medius, minimus), the posterior chain, and the shoulders through multiple planes of motion. The progression methods follow the American College of Sports Medicine’s position stand on resistance training, which recommends progressively increasing training demands, such as adding load once you can exceed your target reps. The nutritional protein ranges are from the International Society of Sports Nutrition's 2017 position stand on protein and exercise.
If you have existing injuries, joint problems, or health conditions that affect exercise tolerance, consult a physical therapist or physician before starting a new training program. This is general information, not individualized medical or fitness advice.