
A standing core workout at home trains the muscles around your trunk and pelvis without planks, crunches on the floor, or special equipment. You stand near a chair or wall for support, brace lightly, and move slowly through marching, reaching, rotating, and anti-rotation exercises.
That format suits people who find getting up and down difficult, prefer to stay upright, or have limited space. Below is a complete 15- to 20-minute routine, with easier and harder options for each move, the mistakes that cause strain, and clear guidance on when to stop and seek advice.
What a Standing Core Workout at Home Actually Trains
Your core is the group of muscles around your abdomen, sides, lower back, pelvis, and hips that helps transfer force between your upper and lower body. It includes the rectus abdominis at the front, the obliques at the sides, the deeper transverse abdominis, the back extensors, and the glutes.
Standing exercises ask those muscles to do a practical job: keep your trunk steady while your arms and legs move. That is different from simply bending forward repeatedly. Marching without letting your hips rock, chopping across your body under control, and holding one weight at your side all train stability as well as strength.
Standing work also challenges balance because your base of support is smaller than it is when lying down. Balance demand is a benefit for many healthy adults, but it is also a reason to start next to support. Feeling unsteady is useful information, not a test to push through.
Who Standing Core Work Suits, and Who Should Choose Something Else
Choose standing work if you dislike floor exercise, have trouble getting down and back up, are training in a small room, or want short sessions you can do in everyday clothes. It also works well as a warm-up before walking or strength training because the positions are similar to daily tasks such as carrying groceries, reaching into a cupboard, and turning to pick something up.
Choose floor work, seated work, or a supervised programme instead in these cases:
- You feel dizzy when standing or have a high fall risk and no support nearby.
- You are recovering from surgery, a hernia, a recent back injury, or childbirth and have not been cleared to exercise.
- Standing for 15 minutes is itself painful or exhausting.
- You need targeted rehabilitation for pelvic floor problems, abdominal separation, or persistent back pain.
Standing does not automatically mean gentle. A fast standing oblique crunch with poor control can irritate your back just as a poorly performed floor crunch can. The advantage here is accessibility and function, not a guarantee of safety.
If you have a long-term health condition, are pregnant, have had recent abdominal or spinal surgery, or get sharp back pain, leg numbness, pelvic pressure, or dizziness during exercise, stop and get advice from a qualified clinician or physiotherapist before continuing. This article is general education for healthy adults and is not a substitute for personal medical care.
Set Up: Space, Support, and the Brace
Clear enough space to take one step in each direction and swing your arms without hitting furniture. Wear supportive shoes or go barefoot on a non-slip surface, but avoid socks on smooth floors. Put a sturdy chair, kitchen counter, or wall within arm's reach.
Before the first exercise, learn the brace. Stand tall with your feet under your hips and your ribs stacked over your pelvis, not flared upward. Breathe in through your nose, then breathe out and gently tighten your abdominal wall as if you are about to be nudged in the stomach. The brace should feel firm, not maximal — you should still be able to breathe and speak in short sentences.
Use that light brace for every rep. If you have to hold your breath, bear down hard, or grip the chair with your full weight, the version you chose is too difficult for now. Make it smaller, slower, or more supported.
The Seven Moves, in the Right Order
Do the moves in this order. The first two teach control, the middle moves add rotation and balance, and the last moves combine everything. Rest as needed, and keep one hand near support until the balance moves feel steady.
1. Standing March With a Brace
Stand tall, brace lightly, and lift one knee to a comfortable height while the opposite arm swings gently, as in walking. Lower with control and switch sides. Your pelvis should stay level rather than tipping toward the standing leg.
Do 8 to 12 total lifts. If your hips rock, lower the knee and slow down. If you cannot keep your trunk upright, hold the chair with one hand and march without the arm swing.
2. Standing Oblique Reach
Place your fingertips lightly behind your ears or cross your arms over your chest. Lift your right knee out to the side slightly while bringing your right elbow down toward it, making a short side-bend through your waist. Return to standing before repeating on the other side.
Do 6 to 10 reps per side. The movement is small. Think ribs toward pelvis, not elbow forcing its way to knee. Pulling on your neck, twisting sharply, or bouncing into the bend removes the core work and adds strain.
3. Slow Wood Chop
Stand with feet slightly wider than your hips and knees soft. Clasp your hands together and start them beside your right hip. Move them diagonally up across your body to above your left shoulder, as if lifting something to a high shelf, then reverse slowly. Your hips and chest turn together a little; your arms do not do all the work.
Do 6 to 8 reps in one direction, then switch sides. Start with no weight. Only add a light dumbbell, a filled water bottle, or a medicine ball when you can move slowly without leaning back or twisting only through your lower back.
4. Standing Anti-Rotation Press
This move trains the opposite skill to the wood chop: resisting rotation. If you have a resistance band anchored at chest height to a secure door, hold it with both hands at your breastbone, stand side-on, and press your hands straight forward without letting your chest turn. If you have no band, press your palms firmly together at chest height, brace, and hold for 10 to 20 seconds while breathing normally.
Do 4 to 6 presses per side with a band, or 3 holds per side without one. Your ribs and pelvis should point the same way throughout. If your shoulders twist, step closer to the anchor or reduce the band tension.
5. Standing Bird Dog
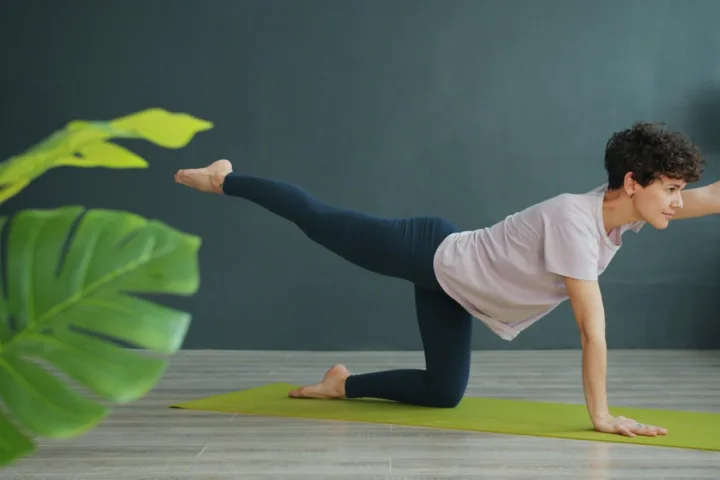
Hold the chair or counter with your left hand. Reach your right arm forward while sliding your left leg back and lifting it only a few centimetres, keeping your toes pointing down. Make one long line from hand to heel without arching your back. Pause for two seconds, then return and switch sides.
Do 5 to 8 reps per side. This is a balance and control exercise, not a back kick. Lifting the leg high usually causes the pelvis to tilt and the lower back to take over. Smaller and straighter beats higher every time.
6. Suitcase March
Hold a light weight, a shopping bag with a book inside, or a filled water bottle in your right hand at your side. Brace and march slowly in place for 20 to 30 seconds. The weight tries to pull you into a side lean; your job is to stay tall and level. Switch hands and repeat.
Use no weight at first if you are new to this. When you add load, choose something you can hold without shrugging your shoulder to your ear or leaning away. Staying upright against a one-sided load is the exercise.
7. Standing Hinge With a Reach
Finish with a hip pattern so your glutes and back muscles share the work. Stand tall, soften your knees, and hinge forward a short distance by pushing your hips back, as if closing a car door with your bottom, while reaching both hands toward a chair in front of you for balance. Keep your back flat and your head in line with your trunk, then stand up by pushing the floor away and squeezing your glutes.
Do 8 to 10 slow reps. You should feel work in the backs of your thighs and your glutes. A rounded back, straight locked knees, or bending only at the waist means you have gone too far for your current mobility.
A 15- to 20-Minute Standing Core Workout at Home
Warm up for two minutes first: walk in place, roll your shoulders, and do a few easy standing marches without the brace. Then do two rounds of the circuit below, resting 30 to 60 seconds between exercises and one to two minutes between rounds.
| Exercise | Round 1 | Round 2 | Easier option | Harder option |
|---|---|---|---|---|
| Standing march with a brace | 10 total lifts | 12 total lifts | Hold a chair, lower knees | Pause 3 seconds at the top |
| Standing oblique reach | 6 per side | 8 per side | Smaller bend, arms crossed | Slower return, 3-second lowering |
| Slow wood chop | 6 per side | 8 per side | No weight, shorter path | Light weight, full controlled path |
| Standing anti-rotation press | 5 per side | 6 per side | Palm press hold, 10 seconds | More band tension, longer press |
| Standing bird dog | 5 per side | 6 per side | Toe stays on floor | 3-second hold, no support if steady |
| Suitcase march | 20 seconds per side | 30 seconds per side | No weight | Slightly heavier weight, slower steps |
| Standing hinge with a reach | 8 reps | 10 reps | Shorter hinge to a chair | Pause at the bottom, slower stand |
Short on time? Do one round only, keep the rests short, and you have a useful 8- to 10-minute session. Two good rounds with clean form will do more for you than three rushed rounds where every rep leans, twists, or swings.
Train this routine two or three times a week on non-consecutive days at first. On other days, walk and do your usual activity. Add a third round only when you can finish two rounds with steady breathing, no pain, and no loss of form on the last reps.
How to Progress Without Chasing Soreness
Progress one variable at a time. That rule keeps you able to tell what actually helped and reduces the chance that a sudden jump causes a flare-up.
- First, slow the lowering phase to three seconds.
- Next, add a pause at the hardest point.
- Then, add two reps per exercise.
- Then, add a third round.
- Last, add a small amount of weight to the wood chop or suitcase march.
Soreness the next day is not a reliable measure of a good core session. Mild muscle tiredness during the set, followed by a normal recovery, is a better signal. If your form changes to finish a set, the set is already finished — rest, make the next round easier, or stop for the day.
Keep a simple note after each session: which version you used, how many rounds, and any pain during or after. That record helps you progress steadily and gives a clinician useful information if a problem appears.
Mistakes That Make Standing Core Work Feel Wrong
Arching your lower back. This often happens during the bird dog, wood chop, and hinge. Shorten the movement, brace before you move, and think of your ribs pointing slightly down toward your pelvis.
Moving too fast. Momentum lets you complete reps without controlling them. If you cannot pause at any point in a rep, you are moving too fast for that version.
Holding your breath on every rep. A brace is not a breath hold. Breathe out as you lift, chop, or press, and breathe in as you return. If you feel pressure in your head or pelvic floor, ease the brace and reduce the difficulty.
Twisting only through the waist. Rotation should be shared across your upper back, chest, and hips. Turn your whole front a little, keep your knees soft, and avoid forcing a large range with a weight in your hands.
Choosing the heaviest option first. Standing exercises can look easy in a video and feel very different under load, especially one-sided carries and chops. Start unweighted for at least the first session. Earn the weight by keeping your trunk position unchanged.
Ignoring balance support. Holding a chair does not make an exercise pointless. It lets you work the trunk muscles without spending all your effort on not falling. Remove support gradually, one move at a time.
What Guidelines Say About Frequency and Overall Activity
Core sessions are only one part of weekly activity. According to the World Health Organization's physical activity recommendations, adults should aim for 150 to 300 minutes of moderate-intensity aerobic activity per week, or an equivalent mix, and should also do muscle-strengthening activities involving all major muscle groups on two or more days per week.
The Centers for Disease Control and Prevention gives similar adult guidance, including muscle-strengthening activity on at least two days a week. This standing routine can count toward the strengthening part of your week when the exercises challenge you and cover the trunk and hips, but it does not replace walking or other aerobic activity.
Those are general population guidelines, not personal targets for everyone. If you are starting from very little activity, building gradually from two short sessions a week is a reasonable approach. Small, repeatable amounts done consistently are more useful than one long session that leaves you unable to train again for a week.
Standing Core Questions, Answered Straight
Is a standing core workout as effective as floor exercises?
It can be effective for trunk strength, balance, and control, provided the exercises challenge you and you progress them over time. Floor exercises are better for some goals, such as learning certain plank variations, while standing work is better when floor access is a barrier. The best format is the one that matches your body, your goal, and your ability to train consistently.
Can I do this workout every day?
You can move every day, but you do not need to train the same hard core circuit daily. Do the full routine two or three times a week, and use walking, mobility work, or a single easy round on other days if you enjoy it. If your performance drops or soreness lingers, you need more recovery, not more willpower.
Do I need dumbbells for a standing core workout at home?
No. Your body weight, a chair for balance, and a band if you have one are enough to start. A light dumbbell or filled bottle only becomes useful for the wood chop and suitcase march after your unweighted form is steady. Buying equipment before you know which moves suit you usually adds cost without adding benefit.
Why do I feel these exercises in my lower back?
Your back muscles are part of your core, so some effort there is normal, especially during the hinge and bird dog. Sharp pain, pain that travels into your leg, numbness, or pain that worsens as the set goes on is not normal effort. Shorten the range, brace before moving, reduce any weight, and stop if those symptoms continue.
Will standing core exercises flatten my stomach?
No exercise can be promised to flatten a stomach or remove fat from one area. These exercises can strengthen the muscles under the tissue and may improve how you stand and move, which can change how your midsection looks. Overall body composition depends on many factors, including total activity, food, sleep, and health conditions.
How long should each session take?
Most beginners will finish the warm-up and two rounds in 15 to 20 minutes, including rests. One round takes about 8 to 10 minutes and is a sensible starting point. Leave enough rest to keep your form clean rather than cutting rests to make the session shorter.
Related Home Workouts
- 10 Abs Workout Routines at Home to Build a Stronger Core Without a Gym
- Core Workout at Home With Weights
- Core and Back Workout at Home
How This Guide Was Put Together
This guide is based on general adult activity guidance from the World Health Organization and the Centers for Disease Control and Prevention, linked above, and on standard principles for teaching trunk stability, balance, and hip-hinge technique to beginners. It does not claim personal testing, expert review, or individual assessment of any reader.
Sources
- World Health Organization. Guidelines on physical activity and sedentary behaviour, 2020.
- World Health Organization. Physical activity fact sheet, 2024.
- Centers for Disease Control and Prevention. Adult activity: an overview, 2023.